Showing posts with label Project a Day. Show all posts

Wednesday, November 27, 2013

Project a Day: #24 Itty Bitty Bunny

Earlier this year, Natasha (Bamboo Blossom) gave me this really cute Crochet book for making children's clothes, toys and accessories. This is the very first pattern I used from this book. 

 -BUNNY!-

 -I put the translation of the name of the book in the description on the photo above-
-the patterns in this book are really cute and will come in handy with all our friends having babies this year and the next. I sure have a lot of gifting to do-

-some detail shots, so you can see how cute this little bugger really is. This was a very quick and easy pattern to follow. I added the little furry tail, as the pattern didn't have one. And what's a bunny without a bushy tail-

Happy Tuesday


Sunday, November 24, 2013

Project a Day: #23 Removable Tea Shelf

Hello, there friends! So, I've been wanting to do this project for a while now. Living in a rented home is quite restrictive as we cannot change any fixtures. Our kitchen cupboards are built quite impractical, their deep and high but small. So what happens is everything is heaped up onto one level and you can never find anything. I then decided to make a little removable shelf that would fit perfectly inside the cupboard. Obviously I had to seek help as I don't have and wood working tools. So I went to my dad with the measurements and came home with a raw shelf made of old reclaimed wood he had lying around. I covered the shelf with self-adhesive paper and was a very happy chappy! 

 -I had to remove the existing shelf to get my shelf in and the put the original back again. it work perfectly and look so much neater-

-I simply love how it turned out, even Dave likes it-

Enjoy the rest of your weekend


Friday, November 22, 2013

Project a Day: #22 DIY Fishy Earrings

Happy Friday, Friends! I decided to make a DIY tuto of today's project as it is the quickest, easiest one there is! These earrings were inspired by Poppy's Dinosaur earrings in the movie Happy Go Lucky. We were out shopping and I spotted a plastic shop, I never pass one of these without having a browse through the entire shop. You never know what awesomeness could be hiding somewhere in plain site! Needless to say, we went into this particular one and I came across these cute toy plastic fish, just as I put them back on the shelf, I though: "these would make crazy cool earrings!" So I bought for little guys to make two pairs of earring with.

To make your very own pair of Fishy Earrings, you will need:

* a pair of cutesy plastic fish
* 2 jump rings
* 2 earring hooks
* 2 pairs of pliers
* a candle
* an old, thick needle

Step 1: Using a pair of pliers, heat up your needle over the lit candle.

Step 2: Aim the needle at the position where you want to make your hole, hold steady and push the needle through you fishy's fin.

Step 3: Using two pairs of pliers(one in each hand) to carefully open your jump ring. Hook the jump ring through the hole in your fishy, adding your earring hook, close the jump ring and you're done! 

Now repeat steps 1 through 3 for the other earring and you've got a pair :)

-aren't they cute? hope you enjoy making your own-

-Happy Friday-


Project a Day: #21 Crochet Coral Necklace

Hey there, just a quick project. I came across this half finished crochet necklace when I unpacked my beads box recently. Thought it was high time I finished it, so I did. I used a simple crochet chain stitch for the beaded parts(having strung the beads onto my crochet cotton before hand). The pretty "border" part is from a crochet book Dave's mom and dad gave me quite a number of years ago called, Hekel - Die volledige handleiding vir Suid Afrika. This translates to Crochet - The complete guide for South Africa by Heidi Fuchs and Maria Natter. This book was originally publish in German. 

-it does kinda remind me of The Little Mermaid…what do you think?-

I love crochet, it's such a versatile technique! What's your favourite technique?


Thursday, November 21, 2013

Project a Day: #20 Crochet Project Bag

So Project #20 is not quite finished yet, it's taking quite a bit longer than I thought. Also, taking into account that I left it lying dormant for more than a month. I started on it again this past weekend and will post the final result soon, I hope. 

 -apparently this motive is also called a Sunburst Granny Square, pattern found here. I really like how this motive looks and feels-

-The bag I'm using is from when I bought the fabric for my wedding dress. It's a sturdy Hessian bag with a plastic layer on the inside. Both the purple yarns are from a previously frogged project. I can't wait to finish this project as I would love to flaunt it around town-

-There are always ways to beautify old and ugly things, you just need to think on your feet and be on the lookout for ideas and inspiration. Which is all around us, we just need to observe and take note of those ideas that often fly right past us-

-Happy Creating-


Wednesday, September 18, 2013

Project a Day: #19 Sunburst Granny Cardi

It's mid-week AGAIN! I'm counting not only days but hours till we leave for Pretoria! This Project took me about a year and a bit to finish. Half of that time it was sitting in a bag waiting to get done. It seems to have become a thing for me, I go into a project with all my might and energy and then it's like I'm no longer intrigued by it and find something better more interesting to do. Then, for some reason the project sticks it's head out and says: "I'm ready to be finished now" and then I finish it. During the time I started on this project, I couldn't find any reference or patterns for what I wanted to do. So, I made up my own pattern and it's a real show-stopper!

 -I'm so happy with how it turned out! It's warn and lovely and an instant "pick-me-up". The Colours are so bright eyed and bushy tailed... -

-in the above picture, you can see the awesome maroon yarn that I found at a local charity shop! It' Acrylic but oh so soft... The rest of the yarn are from my very first crochet blanket which I decided to frog. I know, crazy right? I couldn't really use the blanket because (being my very first) it was crocheted so tightly that it was a stiff block of a blanket. My tension is so much better now, having about 10 years of crocheting experience. Wow, that's a lot, never thought about it like that... Anyway, I know I should probably block this project but I kinda like the texture it's creating. Also, I'm still deciding whether or not to add edging and buttons. What do you think?

xxx

Wednesday, August 21, 2013

Project a Day: #18 Flowers in the Honeycomb

Ah, Tuesday is gone! Had a great Social Media Training session at the Houw Hoek Inn today, hosted by BizXnet. Wow, my head is spinning! Social networking overload! I had no idea what one could actually achieve if you knew how to use all the social networking platforms effectively! It's a two day workshop, so I'll be learning some more tomorrow.

Now, I don't know if you'll remember, I started work on this hexagon blanket about two years ago. It sat in the closet unfinished for about a year and now it is finally finished! This is by far the biggest crochet project that I have ever done.

 -the main reason for this project's "storage" was that I didn't know how to put the motives together. I didn't want to sew then together, so I started experimenting with crocheting the motives together. Epic Fail! So into storage it went. I then thrifted a granny square blanket and noticed that the squares had been crocheted together. It took a while, but I figured it out by copying the pattern off the thrifted blanket. It was then that I took the box filled with hexagon out of storage and began to crochet them together-   
-I finished working in the ends in Feb of this year, forgot to take photo's of the finished project and forgot to blog about it. It has been sitting pretty on our couch for the past 6 months now. So at last, here it is! Blogged and shared with all of you. I must say I was quite chuffed with myself when I worked in that last thread! A gruelling process, but man, was it worth it-

Do you have a project stored away, just waiting to be finished? Please share by leaving a comment/link below. I'd love to know that I'm not alone in this "storing-my-project-for-a-year" thing.

xxx 

Monday, August 19, 2013

Project a Day: #17 From Doily to Cushion

Hi friends! Monday has come and past! This weekend feels light a vague memory. I do have some makings to share with you, though. A while back, I found these two fairly large doilies at a charity shop. I recently decided to turn them into scatter cushions for our couch.

 -my sewing is improving somewhat, but it's still not quite there yet. At least I can make button holes... these doilies have been crocheted a bit skew making the edging a bit ridged, but it'll do. I found the peacock cushion cover (in the top image) at our local Hospice shop, I only had to add an inner- 

   -This one will be done soon, it's slightly skewer than the first one so it might get tricky when sewing this one to the cover. I'll be sure to post a photo when it's done-

-Have a good week-
xxx

Friday, August 16, 2013

Project a Day: #16 Another Owly for Leia

My goodness! I cannot believe where time has taken us! My little niece, Leia, has turned 3! Unfortunately, due to work, Dave and I couldn't celebrate her birthday with her. So I sent our present with my parents when they went to George for Leia's birthday.

 -this is my very first fabric yarn, loom knit. I used old T-shirts to make the yarn and felt off-cuts for the appliquéd bits. This owly is also a fibre scrap gobbler. I threw all my off-cuts into a bag over time and used it to stuff this owly. Talk about recycling-


-Thanks to my mom for posting the photo above, on my Facebook. Apparently, Leia was so excited when she saw this big owl. My mom says Leia just couldn't leave it alone. Nothing makes me happier than knowing that my handmade goodies make their recipients happy-  

xxx

Thursday, August 15, 2013

Project a Day: #15 A Japanese Rose for Lily

Just as we thought Spring had sprung early, the Winter rain hit us and it hit real hard. Besides the lovely sunny past weekend, it has been pouring for two weeks non-stop! Rivers are over flowing, roads are flooded, there is water every where! I don't mind it though, I love this weather. Besides, our region could use all the water it can get. Because of our winter-rainfall, we usually have water restrictions in the summer as most of the water evaporates in the heat of our summer sun. Then there is also the issue of the water usage doubling in summer as tourist and holiday makers stream in to our little town for the Whale season and our amazing beaches.

...but enough babbling! What I really want to talk about is my friend Lily. It was her birthday 15 July and we were all invited to celebrate with her that following Saturday at her South African family's home. The celebration was supposed to be a surprise so I browsed through Lily's Facebook photo's to get an Idea of what colours I would use to make her gift. She looked so fresh is some of her photo's, where she was wearing a bright Teal scarf so I went with that. 

 -I know Lily is Chinese but I could only find a Japanese rose pattern. The Japanese are oh so good at writing crochet patterns, they also invented the language of crochet charts-

-The rose came out kinda ombre, I love it! This was my first attempt at this pattern. I couldn't find suitable leaf patterns so I made my own. Not to bad, if I say so myself... At this moment Lily owns a one of a kind "OddOneOut" as I only made one of these, especially for her-

PS. Thanks for posting this photo on my fb wall, Lily, I'm so glad you like your gift. And you look so pretty, too :)

xxx  

Wednesday, August 14, 2013

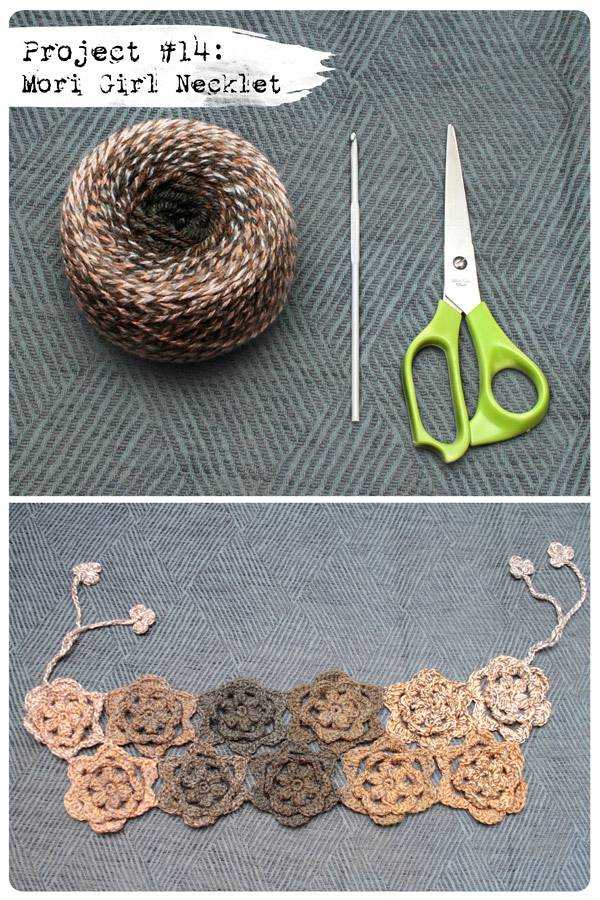
Project a Day: #14 Mori Girl Necklet

It seems our winter has only just begun. It is freezing today! Today's project was inspired by all the lovely Japanese flower scarves I've been seeing on Pinterest. Go to my love crochet board to see some of the pretty ones I've pinned. For this "necklet" I used this crochet flower pattern and then I kinda just made it up as I went along. So I guess you can say I just created a pattern.

 -for this pattern, I used half a skein of Spice, Double Knitting. It's lovely for an Acrylic yarn, very soft on the hands while working it. Almost no yarn was wasted, the only off-cuts were from the finishing off(a few tiny pieces)-

 -At last this outfit is complete! I made this body con skirt last year but couldn't get an outfit together that "spoke to me". This year I found the forrest green tights at Fashion Express, the waterfall card at Meltz and now my Mori Girl Necklet has brought this outfit together perfectly-

xxx 

Tuesday, August 13, 2013

Project a Day: #13 I made an Owlknit

Ah, what lovely rainy weather we've been having. It's so good to be back on my blog again! I've missed out on so many of my fellow bloggers' posts, I can't wait to catch up. So, how perfect is this? That my 30 Projects challenge would pick up right where I left off...

So many has happened in the past two months, I'm sure we all could attest that. Our Paster's wife, Tinneke, had her baby shower in June and they're expecting a girl (Kristen). I've had this idea for a while now and finally had the opportunity to test it. A little, plush, knitted owl whom I call: Orea. She is an Owlknit. Orea is a real softy and she loves staying awake at night to watch over her soon to be born friend.

   -and just for the fun of it, I added this cute, pink, rubber ducky and pink ice-cream bubbles. Just to round it off, what would a gift from me be without an OddOneOut postcard-

-Orea was hand knitted with much love and carefully assembled. I do hope that little Kristen will enjoy having her around. Aw, isn't she a cutey?-

PS. Did you see my new knitting needles? Aren't they lovely? Since I've started knitting, I've realised that the size of your needles makes a huge difference, so I'm starting to collect some needles.

xxx   

Thursday, June 27, 2013

Project a Day: #12 Fillet Crochet Cowl

Wow, what a day! My Aunt Charmaine and her son Reynier are visiting with my parents from Pretoria for a few days, so I've been out and about with them. It's so wonderful to see them! They leave again on Sunday so our time together is very short.

This morning I had a few thing to do in town so of course I did my charity rounds. I found some lovely things which I will be sharing with you later. I also saw the first whale of the season! And tomorrow I'm going out on the Whale Charter with my family! Poor Dave has to be at work...I love having flexi hours! Only problem is, the last time I was on a deep sea boat I got sea-sick. I sure hope I'll be okay tomorrow, I would like to be able to enjoy it and take loads of photo's.

Okay... back to the project. Last year my aunt Leiro, gave me this awesome vintage crochet book. I've tried out a few of the patterns already. Then I found a lost skein of blue acrylic wool in a bag of thrifted goodies and thought to make a one-skein-project. Flipping through my vintage chrochet book, I came across a fillet crochet pattern chart. I started with it immediately and worked until the wool was finished. I added buttons and my cowl neck scarf was done. Easy as pie!

 -It looks quite interesting when it's on and it's such a soft acrylic too. Unfortunately, most thrifted wool don't have they're labels on anymore, so I don't know what it is if I wanted to get more-
 
 -What a lovely book this is. Above, you can see the chart I used was actually meant to be a bedspread. I only used a small section of the chart to make my scarf more appealing to the eye-
 
  -I love how it's casual and stylish at the same time. I added vintage wooden buttons which gives it a real nice touch. I hope that my shenanigans are at least a tiny bit inspiring to you and that you can see that things don't always have to be what someone said they should be-

Have a lovely Friday and then it's weekend!

xxx

Wednesday, June 26, 2013

Project a Day: #11 Quick and easy Collar Scarf

Ah! This was a quick one, I worked on this one over the weekend. It's as simple as buy two 5og skeins of Fancy wool, cast on 20 stitches on appropriate sized needles, knit garter stitch until you reach 62cm(24.5") and then cast off. Take a ribbon or lace of your choice measuring 2m(+/-2.5 yards), weave it through the knitted piece as shown below and Bob's your uncle.  

 -It came out quite lovelier than I'd imagined-

-It reminds me of those fur stoles the ladies of the 1920's used to wear, chic and warm too. would look fabulous with a black lace flapper dress-

xxx

Project a Day: Project #7 finished at last!

Hi friends, it's such a lovely Wednesday here in Hermanus. It's a bit nippy, but beautiful non the less! This month's Project a Day challenge didn't quite go the way I planned. Did you ever get so busy that you hit a complete blank? I have loads and loads of half finished projects just waiting be picked up but before I know it, I'm starting at least three NEW projects! 

Project #7  was started way back on the 7th of this month but it took much longer than I had initially thought. It must have something to do with the fact that each bobble stitch is a x4 repetition of "yarn over, pull-up yarn" this took quite some doing. I decided to keep this project close by. If ever there was a second to spare, I would crochet a few bobble stitches. So at long last it is finished and oh so cosy.  

 -what a wonderful feeling to have stuck it out and at last finished this snood-scarf-
-It so warm and funky and you can really play around with it. I must say, I'm quite in love with the snug-ness, hehe-
 
-In the top image, you can see that I made it quite broad and fairly long and then joined the ends to make it an infinity scarf. In the bottom image, I have wrapped it around my neck twice. This makes for a thick "wind-proof" snood. LOVE.love.LOVE-

xxx

Wednesday, June 19, 2013

Project a Day: #10 From Old Blanket to New Scarf

Welcome! If you're here for the first time, thank you for joining us. I'm currently busy with a "Project a Day" which was interrupted by good times and family visits but now I'm back and we continue to Project #10. In my previous post, I told you about the crochet blanket I found at a local charity shop and how damaged it was when I opened it up at home.As I was taking it apart, I got this idea to make an infinity scarf(I'm kinda addicted to those).

 -Ta-daaaa! This was quick and really fun to make. It's also one of the coziest scarves I've ever made-
 
-There was really nothing to it. I used squares from my damaged thrifted blanket, added rows where needed and crocheted them together in the round. To finish it off, I added three rows on either side and that's me finished-

-There is a scarf-project in our little town for the disabled children of the Camphill School in Hermanus. My gran knitted a right fluffy one while they were here and so I decided to donate this one to Camphill School. I hope that my scarf will keep someone snug this winter-

xxx

Monday, June 10, 2013

Project a Day: #9 Pom-Pom Shoe Clips

And so the new week begins... to tell you guys the truth, I really didn't feel like blogging right now. It's so cold here, I just want to sit under a blanket with a hot cup of Chai Tea and watch a movie. But here I am, blogging, for you guys. Because I looooove you :))

After my Pom-Pom making post, I got stuck on making more and ended up making these really cute shoe clips.

What you need to make the Flower Pom clips:

-two small pom-poms
-four crochet leaves
-felt in your colour of choice
-two 'clip-on-earring' clips
 -a glue gun

How to: 
  1. Gather your gear. Cut four small heart shapes out of your felt.
  2. Sew two crochet leaves to one of the felt hearts, as indicated.
  3. Cut a small slit in the middle of your second felt heart. Now take a clip, open it up and slide it through the slit just made. Just like I did on picture #3.
  4. With your glue gun, put a glue-drop on the inside of the clip(that is between the clip and the felt), press the two together for the glue to set.
  5. Glue your pom-pom on top of your felt heart with the sewn on leaves. Glue the felt heart with the clip attached, to the back of the felt heart with the pom-pom and leaves on it. As shone in picture #5. That's your Flower Pom done. (make two)

What you need to make the Blue Pom clips:

-two small pom-poms
-two 'clip-on-earring' clips
-a glue gun

How to:

6. Simply glue the clip to the pom-pom and you're set. (make two) 

 -enjoy this fun look, I did-

xxx

Sunday, June 9, 2013

Project a Day: #8 Making Pom-Poms

Oh, what a lovely Sunday morning I had... My Grandparents arrived yesterday and are staying with my parent for the week and then we'll have them for the weekend coming! We went to greet them today. Ah, how lovely to see them again, it been about a year now. It's going to be a full and busy week, I can tell you that!

I visited my friend, Irma's little shop Matchbox again and came home with some awesome stuff! Like for instance, this Pom-Pom maker set. It's made in Britten and it's got instructions on how to make various pom-pom pets!

-as you can see in the photo above, there is a small and medium sized round pom-pom maker template. Then there is also an oval shaped template. What do you think of the packaging, neat, huh?-

So here's what you gotta do:
  1. Gather your gear! Choose your wool and the size template you would like to use.
  2. Holding a negative and a positive half together, start wrapping the yarn around the template until you feel you want to stop.
  3. When both pairs are fully wrapped, match up the positive and negative ends and click them in place.
  4. Placing the tip of the scissor in the small gap between the ends, start cutting the wrapped yarn right around...
  5. This is what it will look like when you're done cutting.
  6. Cut a piece of yarn about 20 cm(8") long, slip in between the templates as indicated, tie the yarn and pull as tight as you can. Make a knot.
  7. You can now remove the template pieces.
  8. Trim off any ends that might be sticking out and there you have your Pom-Pom!
All Done!

xxx

Saturday, June 8, 2013

Project a Day: #7 Crochet Infinity Snood

It's weekend again! It's really getting cold here where we live and I thought to add a scarf to my winter collection. I bought an infinity scarf last year which is positively awesome! I wear it every other day. It's the same colour the sky was today, like a stormy, cloudy blue. It unfortunately doesn't go with everything so I decided to make a similar one in an emerald green(a colour I'm favouring this season). The day I decided to start the scarf I found a pattern I thought would be perfect but it wasn't. So I used the bobble stitch from that pattern and started my own. Click here for that pattern.

 -I've been working on this scarf half the day now, I didn't think it would take so long to finish. Maybe it's because I made it so broad. I had to though, for it to have that snug snood effect. I'll be working on it little by little everyday and will post the finished product soon, hopefully-

...Stay tuned :))

xxx

Project a Day: #6 Necklace Revamp and a New Idea

Hello friends, I can't believe it's Friday already! It is really starting to scare me how fast the time is passing! Today is my friend Adrienne's birthday and we couldn't even be there to celebrate with her :( Tomorrow, my Grandparents are visiting from Pretoria. We haven't seen them for about a year now. My Gran or Ouma Pollie as we call her, is my biggest fan! I can't wait to see them again! 

Getting down to business, on Thursday I visited my mom again and continued with revamping her jewellery. She had this really ugly little necklace with tinted shell beads(disks), which she loved so much. She wore this thing so many times that all the colour came off the shell beads. When I started on it, it was so gucky on account of the tint making everything sticky. So I took the whole thing apart!

 -I don't know if you can see how the tint has come off the shell beads on this photo. I really don't like this colour combo-

 -My mom has a few strings of beads that she likes wearing in the summer so I thought to make this one to match those in length and then she can wear them all together-

 -When taking apart that old gucky necklace, I got the idea to make a whole new necklace. Using the idea of a few strings of beads together using a bell-cap at the ends and the rest kind of evolved on it's own. It was quite difficult to work and take photo's with this one. I added two chains to the part with the beads and then I added charms to the bottom chain using my long-nose-pliers and tiny O-rings. Spacing them evenly, you can add as many as you like-
 
  1.  Taking the second chain(which is the top of the two)...
  2. Using beading pins, I usually pack them all and then decide in what order I will place them.
  3. Now start by taking the pin with the beads on one by one, measure about the width of your index finger and...
  4. Cut using a wire cutter or the clipping part at the back of your long-nose-pliers.
  5. Now take your round-nose-pliers and roll the remaining part of the pin sticking out, into a nice little circle. Be sure to bend it closed at the bead.
  6. Repeat steps 2-5 until all your beaded pins are done, attach to that second chain the same way  you did the charms...
...And Voila!

-There it is! I've still got one more necklace revamp to do and then my mom will have a whole new set of accessories to play with-

xxx


blogger template by lovebird