Showing posts with label recycle. Show all posts

Tuesday, August 12, 2014

Organizing Life: Black Week (1)

Hey there, friends! Before I share with you what I'm up to… I would like to show you this amazing poster! I know the quality is a bit off, I just couldn't seem to find a link to a person to ask permission to use the original. It all started with my favourite local ribbon suppliers, Ebony & Ivory! I have ordered ribbons from their online shop a few times and I like to just go over to their website to peruse their latest products. They have such a beautiful website, so when I saw they were on Pinterest, I followed them immediately! That is where I found this image… it was uploaded by Mosquitopress and does not have a source or link. I just had to share it with you because I am a Pluviophile. I love rainy days, they comfort my soul! They calm me in the strangest way…I long for rain when it doesn't come around as often as it should. I know many people wouldn't agree, but to me rainy days are amazing! I work better, I sleep better, I think better… but the best thing about rainy days, is that David would let me know he's making pancakes (crepes, as you know it) for dinner! What's not to love?


Getting back to my title, I'm "trying" to sort out my life! We will be moving soon and I have a crazy amount to sort through and throw out before we do. As you well know, I get my fabrics from our local charity shops, thrift stores and many times friends and family will give me bags full of scraps which were going to become landfill. Usually, all the fabric attained, is washed and then sorted into colour families. Now, I have been working with which ever type of fabric comes my way, but lately I have felt the need to work solely with natural fabrics and fibres. My plan is to use up all my thrifted synthetics asap. in order for me start focusing on the naturals. The first colour family is black, so this week will be dedicated to all black supplies I have. To use up as much as I can, to donate what I can't and so forth. Hold thumbs I make it through, because as my fellow creatives know, this is a colossal task!
Let the Black Week begin!


First things first, the fabrics are sorted by type, the small pieces are going to become flowers and the pieces that are big enough might just become pretty wearables! I have ironed the pieces which needed ironing and planned projects for the larger pieces. Starting with the small pieces, I cut them into various squared sizes and made roses using this tutorial. This method of fabric rose making is the quickest, easiest one I've come across so far. Then I made other roses using a combination of my own developed method and this tutorial. I also tried this very cute tutorial.


These pretties will become the most beautiful accessories will be available forsale soon. I shudder to think that some people just throw these bags of fabric in the trash when clearly these fabric scraps have super potential! Do you see the rose(above) with the pop of mint in it and the one on its left? They were what looked like the hem of someones nighties, just look at how pretty they turned out. Next time you shorten a dress or night gown hem, consider what you could make with the offcuts before you chuck it in the bin. My favourite quote comes to mind, "one man's trash is another man's treasure" that is just so true!

Hope you all had an amazingly creative Monday!

xxx

Tuesday, June 10, 2014

Happy Monday Makings #17

Alrighty! It's Monday and I'm dead tired! That's not such a good thing seeing as it's only the beginning of the week. We're enjoying our Winter rain although it's bluddy freezing, I love the rain! The smell, the sound, the feeling of nostalgia… The need to get cosy and stuff myself with chocolates, delicious smelling, tasting hot beverages. When Dave comes home after work and says: "I'm making pancakes!" (not to confuse you but in South Africa we refer to crepes as pancakes). Anyway, it's the best!

Today I wanted to share with you my very first T-shirt Owl Buddy prototype. I designed this lil' guy for friends of ours' baby boy. I wanted to make him something special for his room. As the theme of his room is that of the most adorable forest friends and the main friend being an aspiring wise owl… I decided to make him an owl plush toy. When Mr. Owl was done, I thought: "wow! that went seemingly painless…" so I made another one. I now have two more waiting to be finished off and I received such awesome feedback from the proud mom, that I have decided to put pen to paper and will soon have diy kits available for sale on my online shop "in the making". So please tell me what you think, would you buy a kit like this? Would you enjoy making your own Mr. Owl? I might design Lady Owl as well, I think the girls would like that.


-Mr. Owl is made with 100% reclaimed materials! Recycled T-shirts and thrifted buttons. His inner is made up of fabric and yarn scraps that I have collected over the past year ~whenever I finish a project, I would gather all the off cuts of fabric, thread, yarn and even the fluff that comes from shaving down thrifted sweaters. I chuck it all into my "scraps baggy" and when there is enough, I use it to stuff plush toys with-  


-I hope little Christiaan enjoys his new friend, I made him with a lot of love-

I'm so looking forward to your comments, thoughts and advise on this little "big" project of mine.

Hope you had an awesome Monday!

xxx


Friday, August 16, 2013

Project a Day: #16 Another Owly for Leia

My goodness! I cannot believe where time has taken us! My little niece, Leia, has turned 3! Unfortunately, due to work, Dave and I couldn't celebrate her birthday with her. So I sent our present with my parents when they went to George for Leia's birthday.

 -this is my very first fabric yarn, loom knit. I used old T-shirts to make the yarn and felt off-cuts for the appliquéd bits. This owly is also a fibre scrap gobbler. I threw all my off-cuts into a bag over time and used it to stuff this owly. Talk about recycling-


-Thanks to my mom for posting the photo above, on my Facebook. Apparently, Leia was so excited when she saw this big owl. My mom says Leia just couldn't leave it alone. Nothing makes me happier than knowing that my handmade goodies make their recipients happy-  

xxx

Monday, April 22, 2013

Happy Monday Makings #6

Happy Monday, Friends! It is such a lovely day here in Hermanus, it seems that winter came early this year. There's an chill in the breeze, the sun is dimmed yet hot and the shadows are so very long. This coming weekend I'm taking part in a local market, hosted in the Sandbaai Hall here in Hermanus. Their theme is Recycle, Reuse, Re- claim and so on... As most of my products are already made of fabrics sourced from local charity shops, I was asked to exhibit at this market. So now I'm working on some new ranges, experimenting with new floral patterns, for winter.

 -this pretty was inspired by the little navy piece above, I found it in a bag filled with scraps and offcuts, it had already been sewn. As I went through the rest of the bag I found this lovely Teal hem offcut and thought it the perfect opportunity to try out this folded rose pattern with leaves-
-and there you have it-

xxx


Monday, March 18, 2013

Happy Monday Makings #5

Just thought I'd try my hand at cross stitch and enter a competition at the same time. Most of you (South African friends) have probably seen the latest Visi magazine I love DIY cover competition. Well I decided to enter at the last minute, I chose a rose pattern. I've recently developed a very strong craving for all things rose-related so it just made sense. I used only left over scrap- and reclaimed yarn for this project. As most of my projects are done with reclaimed material, I thought to keep in line with the reduce/re-use/re-cycle theme.

-so here's to the love of DIY-

xxx

Saturday, February 11, 2012

It's my turn to try...

This awesome diy has been making it's rounds on the internet the past few months, especially on Pinterest. So now, at last, it was my turn to try it out! And it worked! I am in love with my new re-vamped scalloped denim shorts! love, love, love, LOVE, love<3  

-click on image for original source-


...and here is mine, ta-dah!
As easy as 1, 2, 3 :) This diy was so quick and so easy, I just want to start cutting up all my jeans
and trousers... 
xxx

Tuesday, January 31, 2012

to make a sock cat:)

There was this pair of toe-socks in my sock drawer which I really loved but all the toes had holes in them. the rest of the pair of socks were in perfect condition. So I thought to myself, how could I possibly throw these out? I then remembered the cute sock animals I had recently seen on Etsy and this was how my version turned out:)
  1. Shave off any fluff with a disposable razor. Plan, cut and sew.
  2. Hand stitch and embroider on the face, ears and tummy. Sew on buttons for eyes. Stuff with any available stuffing, place a sand bag in the bottom and stitch the sock up.
  3. Tie a string with a bell around your kitty's neck and find him a nice spot in the house.

This kitty is called Mao and he was my mom's Christmas present... She loves cats!
xxx

Tuesday, July 26, 2011

Hey Cherry! I got Lucky Packets!

Look at my pretties for my little shop! The pieces of my puzzle are starting to fall in place rather nicely now:) Keep watching this space to see what exiting things lie ahead...

 Just love these Lucky Packets made from vintage story books by Hey Cherry
So pretty, so awesome! They even cater for birthday parties...what a great table gift!

Tuesday, May 17, 2011

Looky what I did:)

I re-vamped and old shelf I found in my Grandfather's garage a few years back. And now it's pretty!!!

 
Love-Love-Love

Wednesday, March 2, 2011

swinging sixties

I found these handmade pillow cases at our local H.O.S.P.I.C.E. shop and thought they would make beautiful scatter cushions...
 So this is 'retro' cushy#1 finished


Fresh, cool colours...and I just happened to have matching fabric for these yo-yo embellishments. 
:)

Saturday, January 29, 2011

- a heart with heart -

During 2010 I was continually inspired by so many bloggers... I have always had a thing for second hand shops and saving the planet and just trying to do my part. Always seeing the potential handbag where you might see a tea cozy. A crochet rug where you see plastic bags, a dress where you might see a bunch of old stinky ties... Well, after stumbling upon Heidi&Seek last year, Hayley(thinker maker) made me realize that I was well on the right track and that I could be even more environmentally conscious in my creating. So then I started thinking not only of what type of materials I use but also where it came from. That's when I started going to charity shops, not for my usual "item-to-be-transformed" but for items which fabric could used to make something totally new. My Gran turned 80 last year October and had received a beautiful American-themed-quilt from my uncle the month before...     


So I went to our local HOSPICE with the picture painted in my mind's eye and I found some old (all cotton) stuff :)

  1. I made my pattern from old newspaper and cut The front basis and the buttoned back out of the red blouse.
  2. Here I did the same, making smaller heart patterns and cutting one out of each of the other shirts, pinning them in place, I went to my sewing machine to applique one layer on top of the other.
  3. For the finishing touch, I made a crochet flower from postal string, worked it off. I cut a small circle from the off-cuts of the red blouse, placed it inside the flower, positioned it on my front piece and sewed it on with a button. Some more buttons were sewn on just because I love buttons.
  4. Using crochet thread, I out-lined some of the heart layers with zig-zag and cross-stitch embroidery stitches. Pinning my front and back panels together, facing each other, I sewed them together with my machine. I then used my buttoned back to turn inside out. 
 ...And there you have a pretty, cozy, American themed heart cushy...
 ... these buttons used to unbutton a shirt not long ago.
 A cushy like this one you just wanna squeeze!

Happy 80th Birthday, Ouma Oriel!
(standing next to my Gran, is my cousin Christa, from Honduras)
What a memorable day<3

Friday, October 15, 2010

Plastic milk bottle mobile...

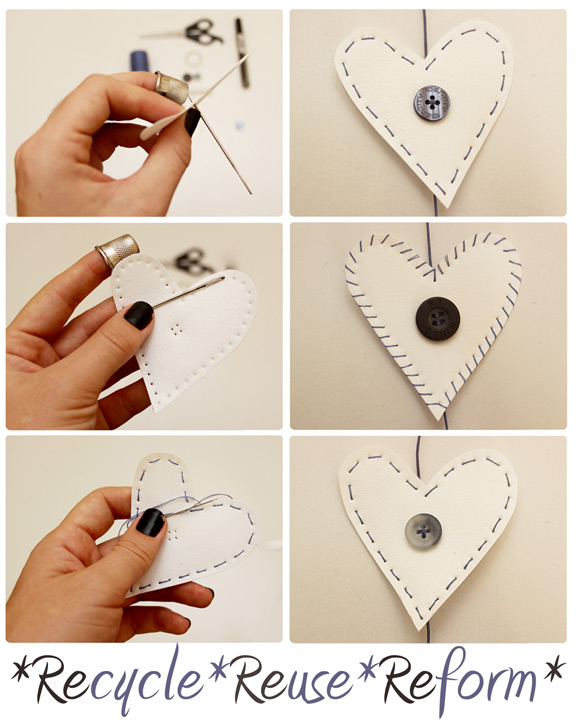
In one issue of the Ideas magazine(http://www.idees.co.za/), there was an article on recycling plastic milk bottles. They gave four templates which could be cut out of the bottles, hung with string from a smooth organic stick and functions as a room divider. So this got my creative juices flowing...
 To make your own recycled plastic heart mobile you will need:  
white plastic milk bottles, a permanent marker, a strong-sharp-needle, a thimble, a keyring, a pair of scissors, thread, string, beads and buttons in the colour of your choice.
 *With your marker, draw out the shape onto the plastic bottle(you can use any other template if you wish). 
*To make it easier to cut out the heart, I have cut the bottom of the bottle off first.
 Cut as many shapes as you want...
*Measure out the length of sting you want to use, neatly knot it around your keyring 
*From the other side of your string, thread a bead and make a knot for it to sit on, leave a space and make a knot where your shape will be placed(repeat this for the amount of beads and shapes you want on your mobile. 
*Now, using your needle and thimble, make holes in your shapes keeping an even distance between holes. Remember to make holes for your buttons as well.
 *Thread your needle with your favourite colour, make a small knot at the end and start threading through the holes you have made. 
*With the same thread, sew the heart onto your string(above the knot) through the button.

...and there you have a fresh, GREEN, present to give to someone special...or you could just keep it for yourself, hehehe!

Sunday, April 11, 2010

Making and wrapping gifts

The time has come for Tricia's(my sister-in-law) baby shower! The theme is "white&silver", as they don't yet know whether they're expecting a boy or girl. Just spent some time in the shops picking out some cute baby clothes now it's time to wrap it up...

I found an old cellphone box and sprayed it it white, then I scratched around in my "recycle" paper stash for some silver. Here is what I used to wrap her prezies.

Something was missing... a card! So, off to the computer to design a card using Photoshop's "OnOne" plug-in.

And that's it all wrapped up! The card slides in behind the "baby" cut out of the silver paper which is neatly tied up with silver satin ribbon. The smaller prezy is wrapped with silver re-used tissue paper, two hearts cut out of the last scraps of silver and white paper( the white heart being slightly bigger than the silver one). I glued the two hearts one on top of the other and sewed on a white button. The small prezy was then made up with white satin ribbon as a finishing touch.

Here's me and Tricia at her Baby shower, she's really got a glow to her.

Oh, I almost forgot, the next day is Tricia's birthday...another present is needed! I decided to make her a crochet brooch to go with the denim outfit she had recently purchased. As always everything I used to make this brooch is being re-used! I also made her a matching bead and button necklace but I cannot seem to find a photo of it anywhere.

Wrapping this gift was a little more fun! I used old newspaper adds and I wrapped each present in about five layers, then I wrapped them together in another three layers. I then wrote her a message on the package with a black marker and tied it up with a Jute string... :-)  


blogger template by lovebird